
Vue 组件通信全景指南 (Component Communication)
1. 核心概念与通信哲学
核心哲学:单向数据流 (One-Way Data Flow) 无论使用哪种通信方式,都应该尽量遵循:数据的所有权归谁,就只有谁有资格修改它。其他组件想修改,必须“发消息”求拥有者去改。
2. 组件通信全家桶实战
我们按照组件之间的物理关系,将通信方式分为四大类。
2.1 父子通信 (最正规、最常用)
这是 Vue 官方最为推崇的通信方式,构成了组件化开发的基础。
1. 父传子:Props
父组件通过在子组件标签上绑定属性向下传递数据。
Props声明
<script setup>
//在使用 <script setup> 的单文件组件中,使用 defineProps() 宏来声明:
const props = defineProps(['foo'])
console.log(props.foo)
</script>
除了使用字符串数组来声明 props 外,还可以使用对象的形式:
//除了使用字符串数组来声明 props 外,还可以使用对象的形式:
<script setup>
defineProps({
    title: String,
    likes: Number
})
</script>
如果你正在搭配 TypeScript 使用 <script setup>,也可以使用类型标注来声明 props:
<script setup lang="ts">
defineProps<{
  title?: string
  likes?: number
}>()
</script>
响应式 Props 解构
<script setup>
  const props = defineProps(['foo'])

  watchEffect(() => {
    //Vue 3.4及以下版本打印foo常量
    console.log(foo)
    //Vue 3.5+  `foo` 由编译器转换为 `props.foo`等效于下面
    console.log(props.foo)
  })
</script>Props校验
defineProps({
    // 基础类型检查
    // (给出 `null` 和 `undefined` 值则会跳过任何类型检查)
    propA: Number,
    // 多种可能的类型
    propB: [String, Number],
    // 必传,且为 String 类型
    propC: {
        type: String,
        required: true
    },
    // 必传但可为 null 的字符串
    propD: {
        type: [String, null],
        required: true
    },
    // Number 类型的默认值
    propE: {
        type: Number,
        default: 100
    },
    // 对象类型的默认值
    propF: {
        type: Object,
        // 对象或数组的默认值
        // 必须从一个工厂函数返回。
        // 该函数接收组件所接收到的原始 prop 作为参数。
        default(rawProps) {
            return { message: 'hello' }
        }
    },
    // 自定义类型校验函数
    // 在 3.4+ 中完整的 props 作为第二个参数传入
    propG: {
        validator(value, props) {
            // The value must match one of these strings
            return ['success', 'warning', 'danger'].includes(value)
        }
    },
    // 函数类型的默认值
    propH: {
        type: Function,
        // 不像对象或数组的默认,这不是一个
        // 工厂函数。这会是一个用来作为默认值的函数
        default() {
            return 'Default function'
        }
    }
})
示例
<!-- 父组件 Parent.vue -->
<template>
  <Child :msg="parentMessage" :count="10" />
</template><!-- 子组件 Child.vue -->
<script setup >
// 声明接收 props
const props = defineProps({
msg: String,
count: { type: Number, default: 0 }
})
console.log(props.msg)
</script>2. 子传父:emit
子组件不能直接修改 Props!它必须通过发射自定义事件,通知父组件自己去改。
声明触发的事件
组件可以显式地通过 defineEmits() 宏来声明它要触发的事件:
<script setup>
const emit = defineEmits(['inFocus', 'submit'])

function buttonClick() {
  emit('submit')
}
</script>
这个 emits 选项和 defineEmits() 宏还支持对象语法。通过 TypeScript 为参数指定类型,它允许我们对触发事件的参数进行验证:
<script setup lang="ts">
const emit = defineEmits({
  submit(payload: { email: string, password: string }) {
    // 通过返回值为 `true` 还是为 `false` 来判断
    // 验证是否通过
  }
})
</script>
如果你正在搭配 TypeScript 使用 <script setup>,也可以使用纯类型标注来声明触发的事件:
<script setup lang="ts">
const emit = defineEmits<{
  (e: 'change', id: number): void
  (e: 'update', value: string): void
}>()
</script>
事件校验
<script setup>
const emit = defineEmits({
  // 没有校验
  click: null,

  // 校验 submit 事件
  submit: ({ email, password }) => {
    if (email && password) {
      return true
    } else {
      console.warn('Invalid submit event payload!')
      return false
    }
  }
})

function submitForm(email, password) {
  emit('submit', { email, password })
}
</script>
示例
<!-- 子组件 Child.vue -->
<script setup>
const emit = defineEmits(['updateMsg'])
const handleClick = () => {
  // 触发事件,并携带参数
  emit('updateMsg', '这是来自子组件的新消息')
}
</script>
<template>
  <button @click="handleClick">通知父亲</button>
</template><!-- 父组件 Parent.vue -->
<template>
<!-- 监听子组件的自定义事件 -->
<Child @updateMsg="handleChildMsg" />
</template>2.2 父子双向绑定 (语法糖)
如果父子之间仅仅是简单的表单状态同步,每次都写 props 和 emit 会非常繁琐。Vue 提供了 v-model 语法糖。
1. 双向绑定: v-model
从 Vue 3.4 开始,推荐的实现方式是使用 defineModel() 宏:
<!-- 父组件 -->
<Child v-model="countModel" /><!-- 子组件 Child.vue -->
<script setup>
const model = defineModel()
function update() {
model.value++
}
</script>
<template>
<div>Parent bound v-model is: {{ model }}</div>
<button @click="update">Increment</button>
</template>defineModel() 返回的值是一个 ref。它可以像其他 ref 一样被访问以及修改,不过它能起到在父组件和当前变量之间的双向绑定的作用:
- 它的 .value 和父组件的 v-model 的值同步;
- 当它被子组件变更了,会触发父组件绑定的值一起更新。
<script setup>
const model = defineModel()
</script>

<template>
  <input v-model="model" />
</template>
底层机制
defineModel 是一个便利宏。编译器将其展开为以下内容:
- 一个名为
modelValue的prop,本地ref的值与其同步; - 一个名为
update:modelValue的事件,当本地ref的值发生变更时触发。
在 3.4 版本之前,你一般会按照如下的方式来实现上述相同的子组件:
Details
<!-- 父组件 -->
<Child v-model="searchText" />
<!-- 等价于:<Child :modelValue="searchText" @update:modelValue="newValue => searchText = newValue" /> --><!-- 子组件 Child.vue -->
<script setup>
defineProps(['modelValue'])
const emit = defineEmits(['update:modelValue'])
function updateInput(e) {
emit('update:modelValue', e.target.value)
}
</script>因为 defineModel 声明了一个 prop,你可以通过给 defineModel 传递选项,来声明底层 prop 的选项:
// 使 v-model 必填
const model = defineModel({ required: true })

// 提供一个默认值
const model = defineModel({ default: 0 })
2. 多个 v-model 绑定
组件上的每一个 v-model 都会同步不同的 prop,而无需额外的选项:
<!-- 父组件 -->
<UserName
    v-model:first-name="first"
    v-model:last-name="last"
/><!-- 子组件 UserName.vue -->
<script setup>
const firstName = defineModel('firstName')
const lastName = defineModel('lastName')
</script>
<template>
<input type="text" v-model="firstName" />
<input type="text" v-model="lastName" />
</template>Vue 3.4之前的用法
<script setup>
defineProps({
  firstName: String,
  lastName: String
})

defineEmits(['update:firstName', 'update:lastName'])
</script>

<template>
  <input
    type="text"
    :value="firstName"
    @input="$emit('update:firstName', $event.target.value)"
  />
  <input
    type="text"
    :value="lastName"
    @input="$emit('update:lastName', $event.target.value)"
  />
</template>
2.3 爷孙/跨级通信 (依赖注入)
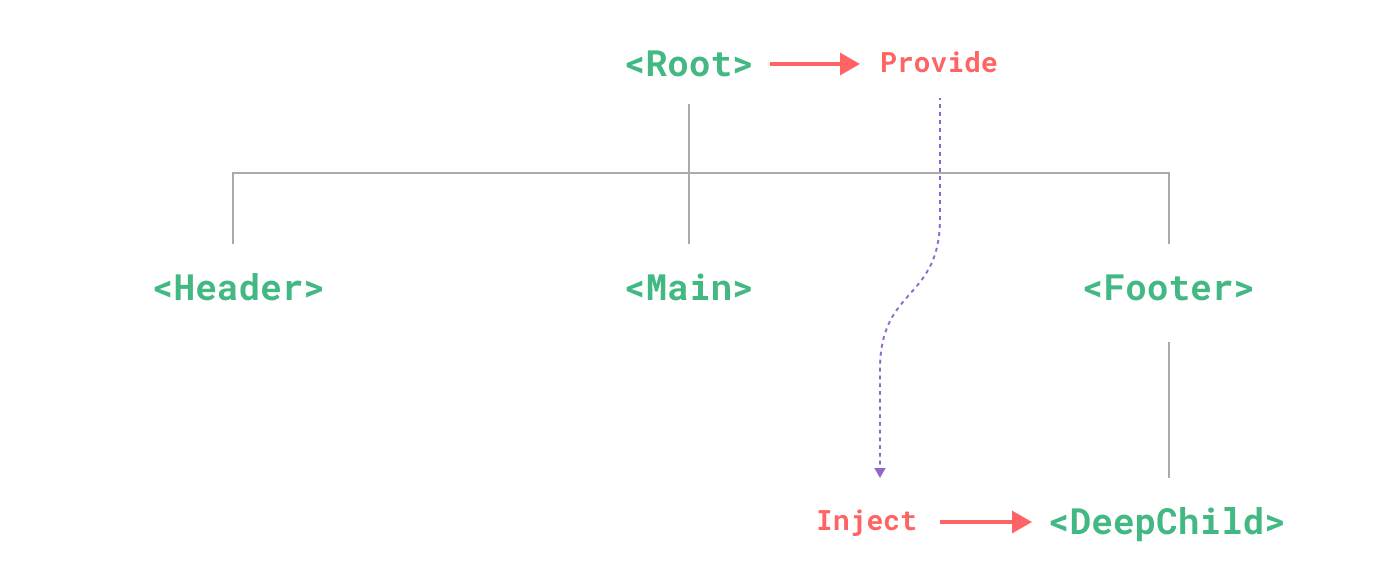
当组件嵌套了三四层(A -> B -> C -> D),A 要传数据给 D,如果一层层写 Props 会引发严重的“Prop 逐级透传地狱 (Prop Drilling)”。
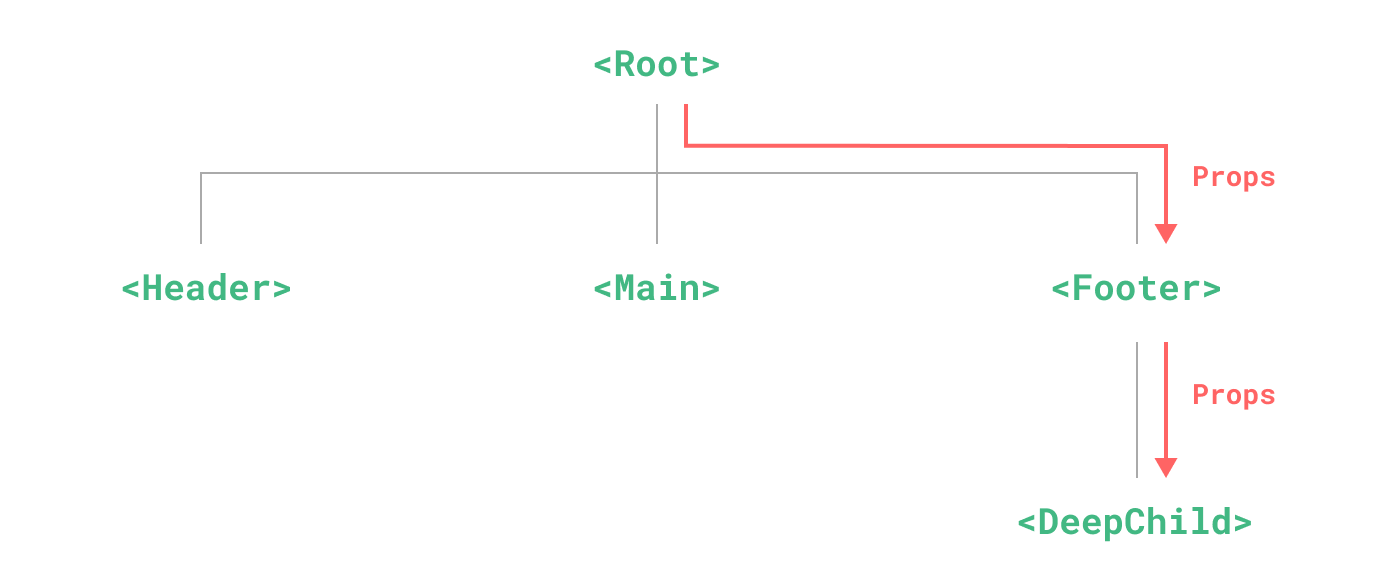
provide 和 inject 可以帮助我们解决这一问题。一个父组件相对于其所有的后代组件,会作为依赖提供者。任何后代的组件树,无论层级有多深,都可以注入由父组件提供给整条链路的依赖。
1. provide(提供)
要为组件后代提供数据,需要使用到 provide() 函数:
<script setup>
import { provide } from 'vue'

provide(/* 注入名 */ 'message', /* 值 */ 'hello!')
</script>
provide() 函数接收两个参数。第一个参数被称为注入名,可以是一个字符串或是一个 Symbol。后代组件会用注入名来查找期望注入的值。一个组件可以多次调用 provide(),使用不同的注入名,注入不同的依赖值。
第二个参数是提供的值,值可以是任意类型,包括响应式的状态,比如一个 ref,提供的响应式状态使后代组件可以由此和提供者建立响应式的联系。
import { ref, provide } from 'vue'

const count = ref(0)
provide('key', count)
应用层 Provide
除了在一个组件中提供依赖,我们还可以在整个应用层面提供依赖:
import { createApp } from 'vue'

const app = createApp({})

app.provide(/* 注入名 */ 'message', /* 值 */ 'hello!')
2. inject(注入)
要注入上层组件提供的数据,需使用 inject() 函数:
<script setup>
import { inject } from 'vue'
//参数: inject(args1,args2,args3)
// args1:provide提供值, args2:默认值, args3:默认值应该被当作一个工厂函数。
const value = inject('key', () => new ExpensiveClass(), true)
</script>
和响应式数据配合使用
当提供 / 注入响应式的数据时,建议尽可能将任何对响应式状态的变更都保持在供给方组件中。这样可以确保所提供状态的声明和变更操作都内聚在同一个组件内,使其更容易维护。
<!-- 爷爷组件 GrandParent.vue -->
<script setup>
import { ref, provide } from 'vue'

const themeColor = ref('dark')
// 提供响应式数据,并提供修改该数据的方法 (严守单向数据流)
provide('theme', {
  color: themeColor,
  updateColor: (newColor) => themeColor.value = newColor
})
</script><!-- 孙子组件 Child.vue -->
<script setup>
import { inject } from 'vue'
// 直接跨级拿到数据和方法
const { color, updateColor } = inject('theme')
</script>使用 Symbol 作注入名
如果你正在构建大型的应用,包含非常多的依赖提供,或者你正在编写提供给其他开发者使用的组件库,建议最好使用 Symbol 来作为注入名以避免潜在的冲突。
// 在供给方组件中
import { provide } from 'vue'
const myInjectionKey = Symbol()

provide(myInjectionKey, {
  /* 要提供的数据 */
})// 注入方组件
import { inject } from 'vue'
import { myInjectionKey } from './keys.js'
const injected = inject(myInjectionKey)2.4 全局/兄弟通信 (状态管理)
1. 全局状态管理:Pinia (Vue 3 标准)
将状态抽离到外部单独管理,所有组件都去订阅这个外部仓库。
// store/user.js
import { defineStore } from 'pinia'
import { ref } from 'vue'

export const useUserStore = defineStore('user', () => {
  const userInfo = ref({ name: 'Guest' })
  function login(name) {
    userInfo.value.name = name
  }
  return { userInfo, login }
})<!-- 任何组件中 -->
<script setup>
import { useUserStore } from '@/store/user'
const userStore = useUserStore()
console.log(userStore.userInfo.name) // 读数据
userStore.login('Admin') // 改数据
</script>2. 事件总线:EventBus (Vue 3 已废弃原生支持)
在 Vue 2 时代,我们常用 new Vue() 暴露的 $on 和 $emit 实现全局事件互发。但在 Vue 3 中,实例接口已被彻底移除。
现代替代方案:
- 优先使用 Pinia 存储标记状态。
- 如果只想要纯粹的事件触发,需安装第三方轻量库,如
mitt或tiny-emitter。
1. 安装 mitt
npm install mitt2. 封装并导出全局的 Event Bus (推荐单例模式)
为了防止在代码里到处写死魔法字符串(Magic Strings),强烈建议把事件名称统一定义成常量。
// src/utils/eventBus.js
import mitt from 'mitt'

// 1. 创建 mitt 实例 (单例)
export const bus = mitt()

// 2. 集中管理所有事件名称,防止手抖拼错
export const EVENTS = {
  USER_LOGOUT: 'USER_LOGOUT',           // 用户退出登录
  REFRESH_DATA: 'REFRESH_DATA',         // 刷新某列表数据
  SHOW_NOTIFICATION: 'SHOW_NOTIFICATION' // 触发全局通知弹窗
}
3. 接收方组件 (挂载与销毁监听 🚨)
接收方组件负责监听事件。极其重要:必须在组件销毁前 (onBeforeUnmount) 手动卸载监听,否则会造成严重的内存泄漏和重复触发!
<!-- src/components/NotificationToast.vue -->
<script setup>
import { ref, onMounted, onBeforeUnmount } from 'vue'
import { bus, EVENTS } from '@/utils/eventBus'

const isVisible = ref(false)
const message = ref('')

// 1. 定义极其明确的回调函数
// 为什么要把回调抽出来?因为 off() 卸载时必须传入和 on() 完全相同的函数引用!
const handleShowNotification = (payload) => {
  message.value = payload.text
  isVisible.value = true

  // 3秒后自动关闭
  setTimeout(() => {
    isVisible.value = false
  }, 3000)
}

// 2. 组件挂载时,开启监听
onMounted(() => {
  bus.on(EVENTS.SHOW_NOTIFICATION, handleShowNotification)

  // mitt 还支持监听所有事件 (常用于开发调试)
  // bus.on('*', (type, e) => console.log(type, e))
})

// 3. 🚨 必须:组件卸载前,关闭监听
onBeforeUnmount(() => {
  bus.off(EVENTS.SHOW_NOTIFICATION, handleShowNotification)
})
</script>

<template>
  <div v-if="isVisible" class="toast-box">
    📢 收到广播:{{ message }}
  </div>
</template>

<style scoped>
.toast-box {
  position: fixed;
  top: 20px;
  right: 20px;
  background: #ff4d4f;
  color: white;
  padding: 10px 20px;
  border-radius: 4px;
}
</style>
4. 发送方组件 / 纯 JS 文件 (触发事件)
发送方可以是 Vue 组件,也可以是纯纯的普通 JS/TS 文件(比如 Axios 的拦截器,这正是 Event Bus 最不可替代的场景)。
在普通 Vue 组件中触发
<!-- src/views/Dashboard.vue -->
<script setup>
import { bus, EVENTS } from '@/utils/eventBus'

const triggerToast = () => {
  // 发射事件,并携带 payload 参数 (第二个参数)
  bus.emit(EVENTS.SHOW_NOTIFICATION, {
    text: '服务器已完成备份!'
  })
}
</script>

<template>
  <div>
    <h2>控制台概览</h2>
    <button @click="triggerToast">向全局发送警告广播</button>
  </div>
</template>
在纯 JS 中触发 (如 Axios 响应拦截器)
这是 Pinia 或 Props 很难优雅解决的场景。
// src/utils/request.js
import axios from 'axios'
import { bus, EVENTS } from '@/utils/eventBus'

const api = axios.create({
  baseURL: '/api'
})

api.interceptors.response.use(
  (response) => response.data,
  (error) => {
    // 💡 绝杀场景:当后端返回 401 身份过期时,
    // 我们在这个没有 Vue 上下文的纯 JS 文件里,直接用 bus 呼叫全局退出弹窗
    if (error.response && error.response.status === 401) {
      bus.emit(EVENTS.USER_LOGOUT, { reason: 'Token 已过期,请重新登录' })
    }

    return Promise.reject(error)
  }
)

export default api
2.5 透传(Attributes)
“透传 attribute”指的是传递给一个组件,却没有被该组件声明为 props 或 emits 的 attribute 或者 v-on 事件监听器。最常见的例子就是 class、style 和 id。
Attributes 继承
<!-- <MyButton> 的模板 -->
<button>Click Me</button>

<!--父组件传入class-->
<MyButton class="large" />

<!--渲染结果-->
<button class="large">Click Me</button>
对 class 和 style 的合并
<!-- <MyButton> 的模板 -->
<button class="btn">Click Me</button>

<!--渲染结果-->
<button class="btn large">Click Me</button>
禁用 Attributes 继承
如果你不想要一个组件自动地继承 attribute,你可以在组件选项中设置 inheritAttrs: false。
<script setup>
defineOptions({
  inheritAttrs: false
})
</script>
我们想要所有像 class 和 v-on 监听器这样的透传 attribute 都应用在内部的 <button> 上而不是外层的 <div> 上。我们可以通过设定 inheritAttrs: false 和使用 v-bind="$attrs" 来实现:
<div class="btn-wrapper">
  <button class="btn" v-bind="$attrs">Click Me</button>
</div>
当你二次封装别人的组件库(比如把 Element Plus 的 el-input 包装成你公司的 MyInput)时,别人组件上有几十个属性和事件,你怎么原封不动地传给它?
useAttrs()(透传 Attributes) 它能捕获父组件传过来的、但你没有在defineProps和defineEmits中声明的“漏网之鱼”(包括 class、style、自定义属性、原生事件)。vue<!-- MyInput.vue --> <script setup> import { useAttrs } from 'vue' const attrs = useAttrs() </script> <template> <!-- v-bind 批量绑定所有透传过来的属性和事件 --> <el-input v-bind="attrs" class="my-custom-class" /> </template>
2.6 插槽(Slots)
1. 父传子(默认插槽和具名插槽)
默认插槽
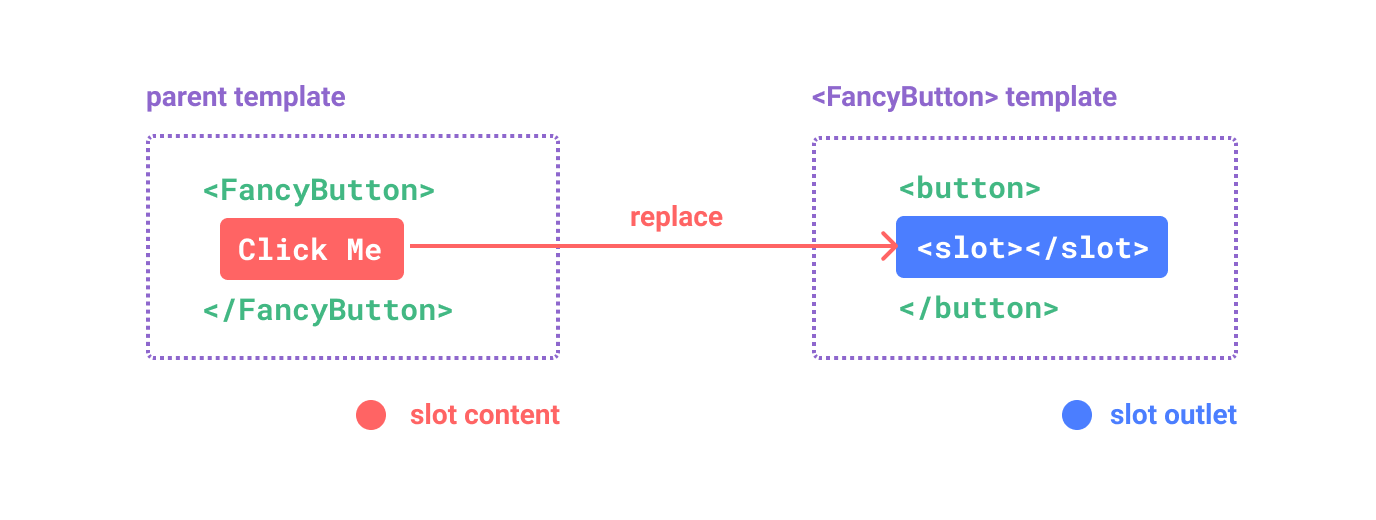
<!--<SubmitButton> 组件-->
<button type="submit">
  <slot>
    Submit <!-- 默认内容 -->
  </slot>
</button>

<!--没有提供任何插槽内容时-->
<SubmitButton />
<!--渲染结果-->
<button type="submit">Submit</button>

<!--提供了插槽内容-->
<SubmitButton>Save</SubmitButton>
<!--渲染结果-->
<button type="submit">Save</button>
具名插槽
<!--<BaseLayout>组件-->
<div class="container">
    <header>
        <slot name="header"></slot>
    </header>
    <main>
        <slot></slot>
    </main>
    <footer>
        <slot name="footer"></slot>
    </footer>
</div>

<!--提供插槽内容-->
<BaseLayout>
    <!--v-slot='header' 等效于#header-->
    <template #header>
        <h1>Here might be a page title</h1>
    </template>

    <template #default>
        <p>A paragraph for the main content.</p>
        <p>And another one.</p>
    </template>

    <template #footer>
        <p>Here's some contact info</p>
    </template>
</BaseLayout>

<!--渲染结果-->
<div class="container">
    <header>
        <h1>Here might be a page title</h1>
    </header>
    <main>
        <p>A paragraph for the main content.</p>
        <p>And another one.</p>
    </main>
    <footer>
        <p>Here's some contact info</p>
    </footer>
</div>
条件插槽
有时你需要根据内容是否被传入了插槽来渲染某些内容,你可以结合使用 $slots 属性与 v-if 来实现。
<template>
  <div class="card">
    <div v-if="$slots.header" class="card-header">
      <slot name="header" />
    </div>

    <div v-if="$slots.default" class="card-content">
      <slot />
    </div>

    <div v-if="$slots.footer" class="card-footer">
      <slot name="footer" />
    </div>
  </div>
</template>
2. 子传父(作用域插槽)
插槽的内容无法访问到子组件的状态。但可以像对组件传递 props 那样,向一个插槽的出口上传递 attributes:

<!-- <MyComponent> 的模板 -->
<div>
  <slot :text="greetingMessage" :count="1"></slot>
</div>

<!--调用模板-->
<MyComponent v-slot="slotProps">
    {{ slotProps.text }} {{ slotProps.count }}
</MyComponent>
作用域插槽类比为一个传入子组件的函数
//父组件调用
MyComponent({
  // 类比默认插槽,将其想成一个函数
  default: (slotProps) => {
    return `${slotProps.text} ${slotProps.count}`
  }
})

//子组件
function MyComponent(slots) {
  const greetingMessage = 'hello'
  return `<div>${
    // 在插槽函数调用时传入 props
    slots.default({ text: greetingMessage, count: 1 })
  }</div>`
}
具名作用域插槽
<!--父组件-->
<MyComponent>
  <template #header="headerProps">
    {{ headerProps }}
  </template>

  <template #default="defaultProps">
    {{ defaultProps }}
  </template>

  <template #footer="footerProps">
    {{ footerProps }}
  </template>
</MyComponent>

<!--子组件-->
<slot name="header" message="hello"></slot>
注意插槽上的 name 是一个 Vue 特别保留的 attribute,不会作为 props 传递给插槽。因此最终 headerProps 的结果是 { message: 'hello' }。
**注意:**如果你同时使用了具名插槽与默认插槽,则需要为默认插槽使用显式的 <template> 标签。尝试直接为组件添加 v-slot 指令将导致编译错误。这是为了避免因默认插槽的 props 的作用域而困惑。举例:
<!-- <MyComponent> template 子组件 -->
<div>
  <slot :message="hello"></slot>
  <slot name="footer" />
</div>

<!-- 该模板无法编译  父组件-->
<MyComponent v-slot="{ message }">
    <p>{{ message }}</p>
    <template #footer>
        <!-- message 属于默认插槽,此处不可用 -->
        <p>{{ message }}</p>
    </template>
</MyComponent>
为默认插槽使用显式的 <template> 标签有助于更清晰地指出 message 属性在其他插槽中不可用:
<MyComponent>
  <!-- 使用显式的默认插槽 -->
  <template #default="{ message }">
    <p>{{ message }}</p>
  </template>

  <template #footer>
    <p>Here's some contact info</p>
  </template>
</MyComponent>
2.7 ref 与 defineExpose
默认情况下,Vue 3 <script setup> 组件是封闭的。父组件想调子组件的方法,子组件必须先“开门”。
<!-- 子组件 Child.vue -->
<script setup>
import { ref } from 'vue'
const count = ref(0)
const reset = () => count.value = 0

// 必须显式暴露,父组件才能访问到
defineExpose({ reset, count })
</script><!-- 父组件 Parent.vue -->
<script setup>
import { ref, onMounted } from 'vue'
const childRef = ref(null) // 名字必须和模板里的一样
onMounted(() => {
// 直接调用子组件内部的方法
childRef.value.reset()
})
</script>
<template>
<Child ref="childRef" />
</template>2.8 总结
面对如此多的通信方式,在真实的工程中该如何抉择?请牢记以下法则:
- 能用 Props / Emit 解决的,绝对不要用其他方式。 这是最易于维护、数据来源最清晰的方案。
- 表单类的子组件封装,无脑使用
v-model。 - 开发高阶、可高度复用的基础组件库(如自己写一个 Element UI),常需要结合
provide/inject(处理类似 Form 表单与 FormItem 的联动)和useAttrs(透传原生属性)。 - 跨路由页面的状态(如登录 token、购物车商品数),不要犹豫,立刻使用全局状态管理 Pinia。
3. 常见问题 (FAQ) 与避坑指南
3.1 为什么 Vue 极其严厉地禁止子组件直接修改父组件传来的 Props?
- 答:这是为了防范**“状态突变导致的代码失控”**。
- 在大型应用中,一个父组件的状态可能会作为 Props 同时分发给 5 个不同的子组件。
- 如果允许子组件直接修改 Props(在 JS 中如果是对象引用,确实是改得动的),那么只要有一个子组件不小心改了它,其他 4 个子组件和父组件的视图都会瞬间莫名其妙地发生变化。
- 此时,父组件根本不知道是哪个“逆子”干的,这会导致排查 Bug 变得如同大海捞针。
- 架构纪律:因此,Vue 强制规定了单向数据流。子组件只能读;想改?必须发个
$emit申请书,让拥有该数据的父组件自己去执行修改代码。这样所有状态的改变都收敛、可追溯。
3.2 父组件通过 provide 传下去的数据,孙子组件拿到了,但父组件数据改变时孙子组件为什么没更新?
- 答:因为你可能
provide了一个非响应式的数据。provide函数本身并不会施加魔法把普通数据变成响应式的。- 如果你写的是
provide('msg', 'hello'),孙子拿到的永远是个死字符串。 - 正解:你必须传入通过
ref或reactive包装过的数据。
js// 祖先组件 const count = ref(0) provide('countObj', count) // 必须传 ref 本身,千万不要传 count.value
3.3 我在使用 Vue 3,以前极其好用的 EventBus (全局事件总线 this.$bus.$emit) 怎么不见了?
- 答:Vue 3 的底层彻底移除了实例上的
$on,$off,$once方法。- 废弃原因:EventBus 虽然写起来爽,但在大型项目中是绝对的“代码维护噩梦”。事件满天飞,根本无法追踪一个事件是在哪里发射的,又是在哪里被监听的,且极易引发忘记解绑导致的严重内存泄漏。
- Vue 3 的替代方案:
- 推荐方案:直接使用 Pinia 进行状态共享。如果只是想互相通知,可以在 Pinia store 里放一个标记状态。
- 备用方案:如果坚持要用事件总线模式(比如封装独立的小型库),官方建议安装第三方的纯 JS 事件库,如
mitt或tiny-emitter。
3.4 什么时候该用 Props/Emit,什么时候该用 Pinia 全局状态?
- 答:这考验你的架构颗粒度感知。
- 选用 Props/Emit:这个数据是不是只在这个组件的局部上下文中才有意义?(比如一个弹窗组件的
isVisible,或者一个商品卡片接收到的productInfo)。这属于局部 UI 状态,坚决不用 Pinia,保持组件的独立性和复用性。 - 选用 Pinia:这个数据是不是很多毫无物理关系的页面都要用?(比如当前登录的用户信息、全局的主题偏好、购物车里有几件商品)。这属于全局业务状态,为了避免恶心的多层跨级传递,坚决放入 Pinia。
- 选用 Props/Emit:这个数据是不是只在这个组件的局部上下文中才有意义?(比如一个弹窗组件的